First, open up your Image. Enlarge the image to get a good view, close-up view of the eyes. Using the “Lasso Tool," select the area of the irises & eyes. By holding SHIFT then selected the other eyes w/ Lasso Tools. Patient & Fully attention are needed. After they are both fully selected, use Feather tool (Alt + Ctrl + D) to smooth the edges, but only a little (around 0.5 – 2.0 is good).

Copy the selected area, and paste it in a new layer. Make sure the new layer of eyes are on the same spot as the first layer.
However, if you want a different colored eye, keep the second layer of eyes in "Normal" mode and go to Enhance in the main toolbar, then Adjust Color | Hue/Saturation. Choose Colorize
Read more...
Make Glitter Text with PhotoShop and ImageReady
Posted by FRIS | 9:27 AM | photoshop, tutorial | 0 comments »
Before you begin, you will want to think about a couple of things. What color and size you want the text to be, and what color is the background that you will be putting it on. You will want to match the background color of this project to the background color of whatever you are going to use it with. This is not absolutely necessary, but I think it looks tons better.
- Create a new document of whatever size you want the text to be.
- Select the color you want the text to be in the foreground color tile. I am going to make mine red.
- Select the horizontal type tool, and type your text. I am using a font called Arial Rounded MT Bold at a height of 100pt. Bolder fonts will work better for this, but choose whichever you like.

You should now have a background layer and a text layer

Next you will need to rasterize the type so that we can add filters to it. Select Layer/Rasterize/Type. Now duplicate the type layer twice so that we have 3 layers of the text. Make sure the type layer is highlighted as shown above and choose Layer/Duplicate Layer and click OK. Do this one more time. Highlight the top layer of text, and select Filter
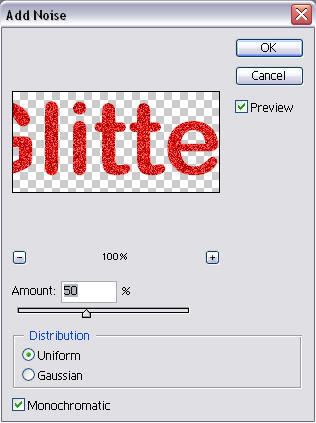
Then hightlight the next layer, but this time add noise at 55%. On the last type layer add noise at 60%. Now we will add a bit of spice to the text to make it really pop. Highlight the top layer and select Layer/Layer Style/Blending Options. I am going to add a stroke, a drop shadow, and some bevel and emboss using the settings shown below. You may have to tweak your settings a bit depending on the type and size of font you are using.
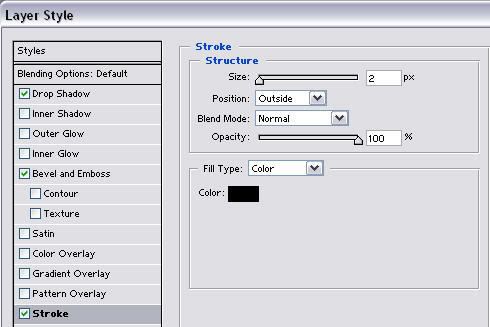
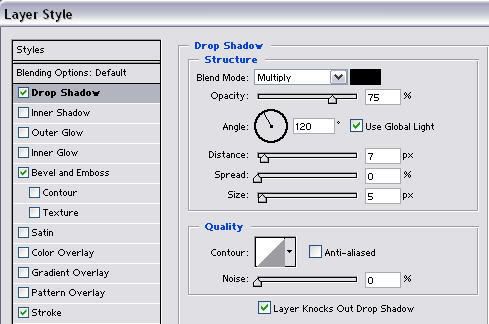
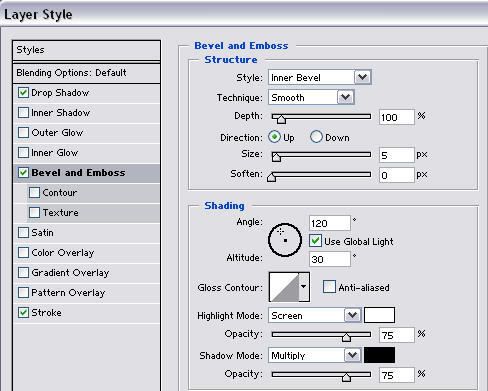

Next we will need to copy this layer style to our other text layers. Right click on the top layer and select Copy Layer Style. Now right click on each of the other two text layers and choose Paste Layer Style. Now the only difference between the layers is the level of noise.
To create our animation we will need to jump over to ImageReady. Cick on the jump to ImageReady button.

Once in ImageReady, make sure your animation window is showing. If not select Window/Animation.
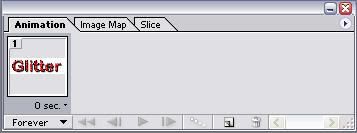
At this point we only want the top text layer and the background layer to be showing. Turn the other text layers off by clicking on the little eyball on their layers. You should have one frame showing as above. Click on the flyout menu of the animation window and select New Frame.

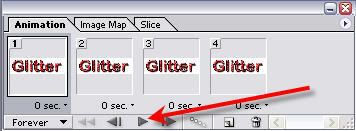
Now turn off the top layer, and turn on the next layer of text. Add a new frame, turn off the text layer that is on, and turn on the bottom text layer. Add one more frame and use the middle text layer again. You should now have 4 frames in your animation. Hit the play button to see how it looks
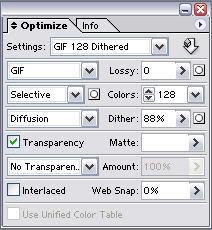
Once you have it the way you want, you will need to save it. Make sure your optimize window is set to GIF. If you can't see the optimize window select Window/Optimize. Here are the settings I use.
Now you will need to select File/Save Optimized As. Choose a folder and a name, and your animated glitter text is web ready.
Here is how mine turned out

Nik Sharpener Pro 3.0 For Adobe Photoshop
Posted by FRIS | 8:44 PM | Download, graphic tools, photoshop, plugins | 0 comments »
Nik Sharpener Pro 3.0 is the most advanced and powerful sharpening solution eliminating the guesswork typically required for achieving superior and consistent results.
New adaptive sharpening algorithms and award-winning U Point® technology for selective sharpening ensure desired sharpness or creative softening of details are easily accomplished. The Sharpening Soft Proof that lets you accurately inspect results before printing saving money in costly test prints, improved handling of new output devices, and new output presets provide repeatable, professional results.

Sharpener Pro 3.0 is the only tool that provides controls for both output and creative detail sharpening of different objects quickly and easily without the need to make different adjustment layers for each object or area.
A recognized leader in digital imaging technology, Nik Software has developed class-leading solutions to specific challenges photographers face when sharpening images throughout the photographic workflow and packaged them in one convenient toolset. Use Sharpener Pro 3.0 to regain clarity in digital images, draw the viewer’s attention to the focal point of an image and archive professional, high quality sharpened images every time.
Features:
- U Point Powered Control Points—Enables precise, selective sharpening control
- Output Sharpening—Provides the ultimate control to create perfectly sharpened images on all devices and media types such as display, inkjet, continuous tone, half tone, and hybrid tone
- Creative Sharpening—Enhances fine details and textures with new structure, focus, and local contrast tools for drawing attention to desired areas within the image
- Industry-First Sharpening Soft Proof—Allows detailed inspection of sharpening results on screen before printing, eliminating costly test prints
- Output Presets—Enables custom settings to be saved for consistent, professional results
- RAW Presharpener—Retains and enhances sharp details within images without amplifying noise and other artifacts
- Powerful Selective Tool (Photoshop
only)—Enables the use of Photoshop’s brush tools to paint in sharpening selectively
- Smart Filter Support (Photoshop only)—Provides compatibility with Adobe Photoshop’s Smart Objects enabling adjustments to sharpening after Sharpener Pro has been applied
- Multi-Image Support (Aperture only)—Provides compatibility with Aperture’s multi-image support, allowing photographers to easily copy and paste settings between images to maintain consistency.
Wedding Enhancers Actions for PhotoShop
Posted by FRIS | 11:48 AM | actions, Download, photoshop | 0 comments »
This simple yet productive set of 12 actions will help you create several common portrait effects, and particularly wedding portraits. The set consists of 11 effects, plus an action with some brief instructions and pointers.

Included in the set is an action to help enhance skin tones, 4 black and white conversions, a dramatic light contrast action, and 5 variations of soft filter effects.
While these actions were made specifically for use on your wedding pictures, feel free to experiment on other types of images as well. Also, you can acheive a wide variety of results by combining these actions on the same image.
The following briefly describes each action:
- "Instructions": Just a few pointers to get you started
- "Improve Skin Tones": This subtle action will accentuate the peach hues in your image, yeilding noticably more attractive skin tones.
- "B/W Conversion (Purity)": The effect results in very attractive, light skin while maintaining a nice contrast.
- "B/W Conversion (Whisper)": Very much a classic looking conversion, the image is given medium contrast with a slight sepia tone.
- "B/W Conversion (Timeless)": This gentle conversion gives your image a soft contrast in the highs, medium contrast in blacks, with barely a hint of warmth. Like a modern image taken using black & white film.
- "B/W Conversion (Generations)": This throwback conversion gives an "antique" feeling to your picture. Complete with sepia tone, grain, and a high contrast in the highs.
- "Dynamic Light Contrast": Find the right image, and this effect will amaze you. It lightens your image, while still preserving a good contrast in the mids and lows.
- "Soft (Subtle)": Attempts to preserve color and tonal range while approximating the look of a soft filter #1.
- "Soft (Normal)": Attempts to preserve color and tonal range while approximating the look of a soft filter #2.
- "Soft (Strong)": Attempts to preserve color and tonal range while approximating the look of a soft filter #2.
- "Soft (Daydream)": Lightens the overall image and applies a strong soft filter effect.
- "Soft (Night Visions): Darkens the mids while smoothing out the highs and applying a strong soft filter effect.
How to use:
Just load the actions into Photoshop
Requirements:
Photoshop CS or higher.
Download these actions at Here.
15 Nice Photoshop Actions
Posted by FRIS | 7:56 AM | Download, graphic tools, photoshop | 3 comments »
Get these 15 Nice Photoshop Actions. Put them on your actions folder of Photoshop, ie: C:\Program Files\Adobe\Adobe Photoshop CS2\Presets\Photoshop Actions 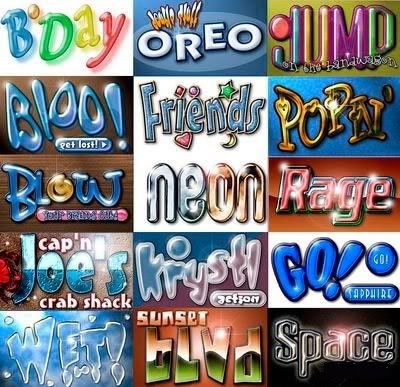
Download now them at Here.
Best Photographic Filters for Digital Photography
Posted by FRIS | 3:11 PM | Filter, photoshop, plugins | 0 comments »
Nik Software Color Efex Pro™ 3.0 filters are the leading photographic filters for digital photography. The award-winning Color Efex Pro 3.0 filters are widely used by many of today's professional photographers around the world to save time and get professional level results. Whether you choose the Complete Edition, Select, or Standard Edition, you’ll get traditional and stylizing filters that offer virtually endless possibilities to enhance and transform images quickly and easily.
Updates to old favorites such as Classical Soft Focus, Darken/Lighten Center, and Vignette filters are joined by exciting new filters Film Effects, Glamour Glow, High Key, Selective Contrast, Bleach Bypass, and more. See the full filter list with sample images here. The result is nothing less than the most complete, most useful collection of photographic filters you can add to your toolkit.
Patented U Point technology provides the ultimate control to selectively apply enhancements without the need for any complicated masks, layers or selections. Control color, light and tonality in your images and create unique enhancements with professional results. With 52 filters and over 250 effects found in Color Efex Pro 3.0 you can perform high quality retouching, color correction and endless creative enhancements to your photographs.
Features:
Color Efex Pro 3.0
Nik Color Efex Pro 3.0 has been significantly updated to provide photo enthusiasts and professional photographers alike with the most powerful yet easy to use set of photographic filters ever created. DSLR owners will revel in the wide range of quick and easy fixes to dramatically improve their photos with just a few clicks of the mouse. Professional wedding, nature, commercial, and portrait photographers will appreciate the speed of workflow and advanced features designed to support uniquely creative styles and deliver class-leading power.
U Point® Technology
U Point powered Control Points make it easy to selectively add, modify and remove a Filter effect using convenient sliders. Award-winning U Point technology gives you ultimate control to selectively apply enhancements without the need for any complicated masks, layers or selections.
New Filters
The new filters in Color Efex Pro 3.0 range from creative enhancements and special effects to re-touching tools and over 30 conventional film emulation filter effects. New filters include Film Grain, Film Effect, Glamour Glow, Selective Contrast, High Key, Low Key, Polaroid Transfer, Cross Balance filters, and more. Previously available filters have also been updated to provide even more options. Click here to see a complete list of filters, descriptions and before/after samples.
New Interface
The new resizable interface lets you easily accommodate large monitor configurations, preview before and after results, and quickly access the entire range of unique tools to match your workflow.
Powerful Selective Tool
Unique among photographic filter software on the market today, the Color Efex Pro 3.0 Selective Tool allows you to quickly and easily brush any filter effect into your image. Layers and masks are created automatically, so you are free to create and experiment unfettered.
System Requirements:
- Windows 2000 Professional, Windows XP Home Edition, Windows XP Professional, Windows Vista
- Pentium III 1GHz or better
- 256 MB RAM
- Adobe Photoshop 7 through CS3, Adobe Photoshop Elements 2.0 through 6.0, or other Adobe Photoshop plug-in compatible Application
More information and download link can be found at here.
Reduce noise on your digital image with Neat Image
Posted by FRIS | 2:38 PM | Filter, photoshop, plugins | 0 comments »
For digital artist, noise is a serious problem in digital imaging. In digital photography, the consumer and prosumer-level cameras produce images with an easily noticeable noise component, which is especially strong in images taken at high ISO rates. Scanned photos contain a similar film grain component. The noise and grain reduce the visual quality of digital images and resulting printouts.
The solution to the noise problem is Neat Image. Neat Image is a digital filter specifically designed to reduce visible noise in digital photographic images produced by modern digital cameras, as well as film and flatbed scanners.
Three main reasons to choose Neat Image:
1. Quality Of Noise Reduction
Provided by Neat Image is higher than that of all other methods because: Neat Image uses the most advanced noise reduction algorithms in the industry.
Neat Image noise reduction algorithms are developed specifically for digital photography applications by a highly-qualified professional image processing research group. These algorithms surpass the quality of all classic noise reduction methods and even that of the wavelet-based methods. Although the wavelet-based methods were developed only 10-15 years ago and are still considered relatively modern, Neat Image uses an even newer and more efficient approach to noise reduction. This approach enables drawing a more clear distinction between noise and details in noisy images. This helps Neat Image reduce more noise and better preserve true image details in digital photos and scans.
Neat Image builds and uses device noise profiles to adapt noise reduction to imaging device.
A device noise profile is a reusable analysis of noise properties of an image acquisition device (a digital camera, scanner, etc.) working in a certain mode. Using a noise profile for an imaging device in effect makes Neat Image noise reduction custom-tailored to this imaging device.
Device noise profile is a novel concept originally introduced by Neat Image team and supported by Neat Image user community who create noise profiles for many digital cameras and scanners.
2. Rich Functionality And High Performance
With this feature, Neat Image enables both beginners and experienced users to easily achieve great results. Neat Image can be used in both Photoshop-centric and standalone workflow.
Photoshop plug-in version of Neat Image can apply noise reduction and sharpening exactly where is required: in a layer, channel, or selection. The plug-in fully respects transparency of image data like the Photoshop built-in filters do, so you can apply noise reduction with different strength to different image areas.
Neat Image plug-in can work as a smart filter in Photoshop CS3. Neat Image Pro+ plug-in can run in Photoshop actions and apply required analysis and filtration completely automatically. You can automatically batch process images using the Photoshop batch facility and an action with Neat Image Pro+ plug-in.
Neat Image plug-in can be used with the following plug-in hosts:
- Adobe Photoshop CS3 / CS3 Ext / CS2 / CS / 7 / 6 / 5
- Adobe Photoshop Elements 6 / 5 / 4 / 3 / 2
- Corel / Jasc Paint Shop Pro X2 / XI / X / 10 / 9 / 8 / 7
- Corel Photopaint 12 / X3
- Ulead PhotoImpact 12 / 11 / 10 / XL / 8
- PhotoLine32
- Microsoft Digital Image Suite 2006
- Microsoft Digital Image Pro
- Serif PhotoPlus
- IrfanView
- XnView
- and more ...
Neat Image is highly automated. You can build noise profiles either automatically or manually. Auto Profiler provides the easiest and quickest way to automatically build a noise profile in just one click. You can also manually select an image area for analysis and let Neat Image do the rest.
Automatic and manual Fine-Tuning Analyzer together with manual Rough Noise Analyzer enable user-friendly semi-automatic and manual noise profiling when you want the complete control over the profiling process.
You can choose which noise profile to use either automatically or manually. Profile Matcher can automatically select the best matching noise profile from a ready-made set using the EXIF data of the input image.
You can manually select the desired noise profile as well. You can rely on default filter settings or manually adjust the filters
Based on accurate noise profile, default filter settings automatically deliver good filtration results without any additional tweaking.
Manual filter tweaking is always available too, if you want to get the result that looks perfect to your eyes. You can easily save and later re-use both noise profiles and filter settings.
Neat Image provides exactly the amount of control required:
- Standard mode offers a simplified control set that is very easy to use for new users.
- Advanced mode gives power users the most complete control set to tweak virtually all filter settings.
- Neat Image helps adjusting filter setting with efficient visual feedback.
- Embedded preview shows how the end result will look like and helps you visually compare 'before' and 'after' versions.
- Per-channel and per-frequency Component Viewer helps to identify noisy image components that require special attention; you can adjust the filter settings corresponding to these components and immediately see the results.
- Variant Selector helps to visually compare the filtration results obtained with several variants of filter settings and select the best variant.
- Full-size comparison of 'before' and 'after' images helps to check the final result before saving the output file in the standalone Neat Image.
- High ISO noise produced by image sensors of digital cameras and scanners (CCD, CMOS, SuperCCD, Foveon, etc.)
- Film grain visible in scanned slides and negatives
- JPEG artifacts in overcompressed images
- Grain aliasing
- Moire patterns
- Color banding
Neat Image v5.85 is able to utilize all available virtual and real cores in hyperthreading, dual-core and multi-core processors (like Core Duo or Core 2 Duo) as well as all processors in multiprocessor systems, which in effect makes filtration 1.5-1.9 times faster on dual-core / dual-processor systems and even faster on multi-core / multiprocessor machines.
Neat Image v5.85 processes an 8 Megapixel digital photo in about 6 seconds on Core Duo 2.0 GHz. This is two times faster than Neat Image v4, four times faster than v3, and ten times faster than v2.
Neat Image supports the industry standard image types and file formats 24-bit / 48-bit RGB and 8-bit / 16-bit grayscale images can be processed (individual channels of Lab and CMYK images can be processed by Neat Image plug-in as well). TIFF, JPEG and BMP file formats are supported in the standalone Neat Image. Any file format supported by Photoshop (or another used plug-in host) can be used with the Neat Image plug-in (for example, you can open a PSD, JPEG2000, RAW, DNG, etc., image in Photoshop and then directly process it with the Neat Image plug-in).
Neat Image preserves all image metadata (like the EXIF and IPTC data). Several tools and resources help you customize Neat Image to your digital camera or scanner. Rich set of free ready-made noise profiles available in the online profile library helps to start using Neat Image faster and easier
Calibration Target and Batch Profiler make building a set of noise profiles for your camera or scanner very simple.
More info and download trial version of this Photoshop filter can be found on its site.
900 Photoshop Actions for Effects, Text, Buttons and Textures.
Here are: Act 72, ActionKit 5, Animated Flag, Barf, Burning Alive, Button Central V2.0, Chroma Toaster, Concrete Decay, Create CD Image, Custom Color, Dom TIAC, dotted-image, Fake Flatten, Filez Text, FireWirl, Glass FX, Gold Nugget, Goldie_AXC, herosactions1, Herosactions2, Hey Joe Video Action, Icon Holder, Interface Look, Iron Cola, Jade FX, Jaguar Design - Obsidian, Jaguar Design - Rust, Jellz KewlPack, KewlPack Action Sets, LavaText, LIA Actions, Liquid Fire, MapMaker, marc_BlueGel, marc_Organic, Outline, Photo doom, Pill Button, POP dotizer, Ray Clouds, Royce, Ruby_Red, Sphere Text, Steely Text, Swart Kat, Terminal, texturizer, The Rock, Tymoes Carbonize, WoW, And Many More.......
You can get them all by downloading at Here.
DFT Digital Film Lab 2.5 For Photoshop
Posted by FRIS | 4:06 AM | graphic tools, photoshop, plugins | 0 comments »
Digital Film Lab simulates a variety of color and black and white photographic looks, diffusion and color grad camera filters, lighting gels, film stocks and optical lab processes. The power of the plug-in lies in its presets which can be loaded to achieve a variety of different effects. There are over 135 useful presets organized into black and white looks, color looks, diffusion, grain and temperature. Feel free to use our presets, modify them or create your own.
Features :
Color Correct
Color Correct manipulates the Black and White, Hue, Saturation, Brightness, Contrast, Gamma, Red, Green and Blue values of the image.
Diffusion
Diffusion creates atmosphere by reducing contrast while creating a glow around highlights or shadows. It simulates diffusion and fog filters as well aglows. In addition, a pre-built texture library allows you to add realistic diffusion
to scenes as if you were adding diffusion directly to your camera lens.
Color Grad
Color Grad colors and or darkens only a portion of the image giving you tability to simulate any Color Grad or ND (Neutral Density) Grad filter. Presefor your favorite color grad filters are provided as well as the ability to create
MAKING DIGITAL LOOK LIKE FILM
The quest to make video and digital images look like film has been going on f years now. Some have even grown entire businesses around this idea. Without making judgments as to which medium is "better" than the other, let’s switch the notion that video and film are completely different animals and both have their advantages and disadvantages. There are a number of factors to consider when attempting to achieve a film look: lighting, cameras and lenses, filters, depth of field, grain and frame rate. While some of these items are addressed during shooting, Digital Film Lab can simulate many of them digitally.
Lighting
In our opinion, the most important factor in achieving a film look is lighting. Don’t just blast a scene with light. Make sure that you employ modeling in yo lighting, making sure that the shadows have some detail and that you don’t completely blow out highlights. Video and digital cameras have a narrower contrast ratio than film and the limits of their brightness range are sharply defined, whereas film gently rolls off in the whites and blacks. Remember, you can always digitally make the shadows darker and the highlights brighter. Going in the opposite direction is murder and yields lousy results.
Cameras and Lenses
Another factor in achieving a film look is the video or digital camera. They frequently have their Detail or Sharpness settings cranked up. Detail controls the sharpness of the image and creates jagged, aliased edges. The first thing to do before shooting is to turn the Detail or Sharpness down. This can be accomplished by adjusting either a menu or pot inside the camera. Once turned down, it is harder to focus but will soften edges.Depth of field also plays a role in the way film is perceived and is a measure the amount of picture that is in focus. Video and digital cameras differ fro35mm film in that they have a much greater depth of field. This is a result of cameras CCD’s being physically smaller than 35mm film frames.
More info and trial download about this plugins can be found at the developer site.
How To Create Your Own Photoshop Brushes
Posted by FRIS | 1:03 AM | photoshop, tutorial | 0 comments »
Creating your own custom Photoshop brushes is easier than you might think.
First, let's create a simple signature brush. Open a new file within Photoshop, approx 500 X 500 pixels. This will be creating a big signature brush, but remember - you can always make it smaller or larger when you use it as a brush. Make sure it has a white background. Everything that is white will remain an "empty" area when it comes to the brush - a gap or a hole, if you will. You'll see what I mean as we go along. Now, using black or a dark color, make your signature.

Mine is fairly sloppy and simple, but you get the idea. You can make it as ornate as you wish. In fact, that's one of the wonderful things about using a signature brush - you don't have to reproduce it each time! Now, under the top menu, under "Edit" click on "Define Brush Preset"

Photoshop will show you a preview of how your brush will look, as well as give you an opportunity to name it. Name it "signature brush" or whatever you like. Notice also that the size of the brush (in pixels) is listed below the preview. That will be the default size that this particular brush opens to. Remember, you can change it to whatever size you like later - up to 2000 pixels. The larger it is here, the less fuzzy it will be at those large sizes.

That's it! Really! Open a new file and play around with your new brush. It will be listed in with all the others that you had currently active. Be careful, however, as it is not yet saved as a part of a brush file, and if you go load a different set of brushes in, it will be lost. We'll show you how to save it in just a moment. Let's make a second, more complex brush, first - then we can save them as a brush set!

Open a picture - any image file will do. I've chosen to use one of my speedpaintings, a penguin. Crop the piece around the part of it that you would like to make into a brush file. You don't want any extra room on the edges that you need to worry about.

You're going to want to have all white surrounding that penguin so that when you make the brush, it doesn't end up with the background being a part of it, too. You can either erase around him and add an all white layer just beneath that layer (multiple layers are fine when it comes to making brushes - it will act as though it was all one flat image when it creates it) or you can simply paint white in around him.

Again, go in to Edit. Define Brush Preset and create your brush. See how all those blues are created to grayscale? All brushes are created that way - Photoshop will do it for you. That is so that when you choose a brush to paint with, you can use whatever color you want! Name your brush and click "OK". Again, feel free to play around with it in a new file. This is what my new brush looks like:

What good is all of that if you can't save them, though, right? So, here's the last part of the tutorial. Saving your new brushes as a set. Go back into your brushes and delete any of the ones that had been previously in there - ones that you do NOT want as a part of your new set. Don't worry, this doesn't delete them as a file, it just removes them from your list of "active" brushes. To do that, right click on the brush you want to delete, and click on "delete" - as simple as that!

When you are left with ONLY the brushes that you want as a part of this new set, click on the same arrow that you would click on to load up new brushes (highlighted in red on the picture to the right), then choose "Save as..". Now, you're going to want to put this in the right directory, so that it will automatically load up in your list of brushes whenever you start Photoshop. Within your Photoshop directory, place it in the Presets>Brushes folder. For example, if you installed Photoshop CS onto your C drive in the path that the installation program defaults to, you would find this folder in: C:\Program Files\Adobe\Photoshop CS\Presets\Brushes\. Choose an appropriate name for it, and you're done!
Note: You will have to reopen Photoshopbefore that brushes set will be visible among those that you can choose from the menu on the right. Alternatively, you can choose "load brushes" and do it manually, but that will append them to the current "active" brushes rather than opening them on their own.
