First, open up your Image. Enlarge the image to get a good view, close-up view of the eyes. Using the “Lasso Tool," select the area of the irises & eyes. By holding SHIFT then selected the other eyes w/ Lasso Tools. Patient & Fully attention are needed. After they are both fully selected, use Feather tool (Alt + Ctrl + D) to smooth the edges, but only a little (around 0.5 – 2.0 is good).

Copy the selected area, and paste it in a new layer. Make sure the new layer of eyes are on the same spot as the first layer.
However, if you want a different colored eye, keep the second layer of eyes in "Normal" mode and go to Enhance in the main toolbar, then Adjust Color | Hue/Saturation. Choose Colorize
Read more...
Make Glitter Text with PhotoShop and ImageReady
Posted by FRIS | 9:27 AM | photoshop, tutorial | 0 comments »
Before you begin, you will want to think about a couple of things. What color and size you want the text to be, and what color is the background that you will be putting it on. You will want to match the background color of this project to the background color of whatever you are going to use it with. This is not absolutely necessary, but I think it looks tons better.
- Create a new document of whatever size you want the text to be.
- Select the color you want the text to be in the foreground color tile. I am going to make mine red.
- Select the horizontal type tool, and type your text. I am using a font called Arial Rounded MT Bold at a height of 100pt. Bolder fonts will work better for this, but choose whichever you like.

You should now have a background layer and a text layer

Next you will need to rasterize the type so that we can add filters to it. Select Layer/Rasterize/Type. Now duplicate the type layer twice so that we have 3 layers of the text. Make sure the type layer is highlighted as shown above and choose Layer/Duplicate Layer and click OK. Do this one more time. Highlight the top layer of text, and select Filter
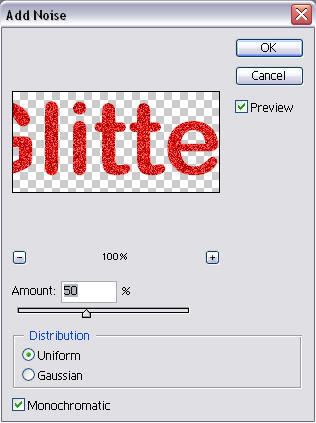
Then hightlight the next layer, but this time add noise at 55%. On the last type layer add noise at 60%. Now we will add a bit of spice to the text to make it really pop. Highlight the top layer and select Layer/Layer Style/Blending Options. I am going to add a stroke, a drop shadow, and some bevel and emboss using the settings shown below. You may have to tweak your settings a bit depending on the type and size of font you are using.
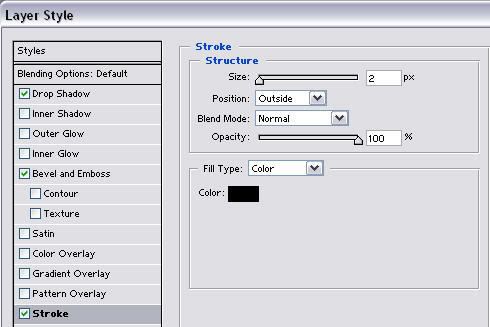
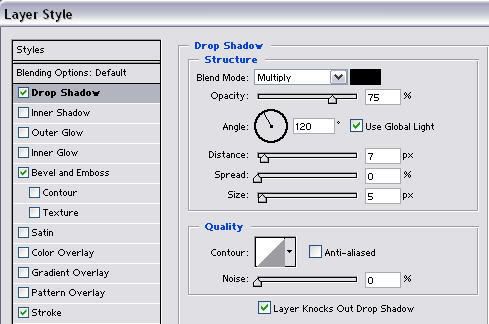
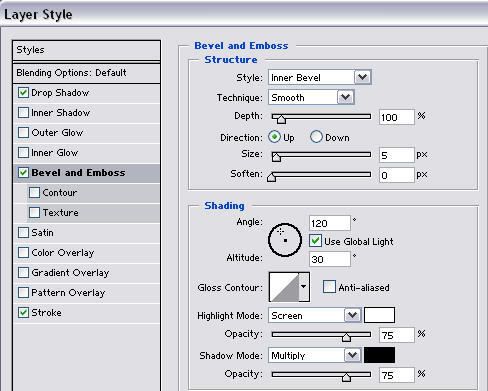

Next we will need to copy this layer style to our other text layers. Right click on the top layer and select Copy Layer Style. Now right click on each of the other two text layers and choose Paste Layer Style. Now the only difference between the layers is the level of noise.
To create our animation we will need to jump over to ImageReady. Cick on the jump to ImageReady button.

Once in ImageReady, make sure your animation window is showing. If not select Window/Animation.
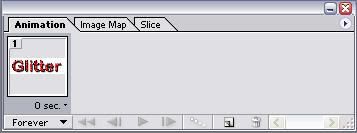
At this point we only want the top text layer and the background layer to be showing. Turn the other text layers off by clicking on the little eyball on their layers. You should have one frame showing as above. Click on the flyout menu of the animation window and select New Frame.

Now turn off the top layer, and turn on the next layer of text. Add a new frame, turn off the text layer that is on, and turn on the bottom text layer. Add one more frame and use the middle text layer again. You should now have 4 frames in your animation. Hit the play button to see how it looks
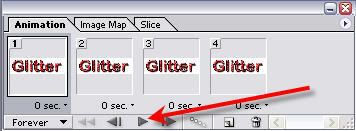
Once you have it the way you want, you will need to save it. Make sure your optimize window is set to GIF. If you can't see the optimize window select Window/Optimize. Here are the settings I use.
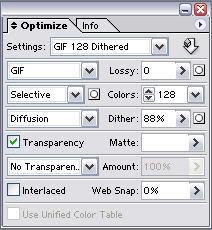
Now you will need to select File/Save Optimized As. Choose a folder and a name, and your animated glitter text is web ready.
Here is how mine turned out

How To Create Your Own Photoshop Brushes
Posted by FRIS | 1:03 AM | photoshop, tutorial | 0 comments »
Creating your own custom Photoshop brushes is easier than you might think.
First, let's create a simple signature brush. Open a new file within Photoshop, approx 500 X 500 pixels. This will be creating a big signature brush, but remember - you can always make it smaller or larger when you use it as a brush. Make sure it has a white background. Everything that is white will remain an "empty" area when it comes to the brush - a gap or a hole, if you will. You'll see what I mean as we go along. Now, using black or a dark color, make your signature.

Mine is fairly sloppy and simple, but you get the idea. You can make it as ornate as you wish. In fact, that's one of the wonderful things about using a signature brush - you don't have to reproduce it each time! Now, under the top menu, under "Edit" click on "Define Brush Preset"

Photoshop will show you a preview of how your brush will look, as well as give you an opportunity to name it. Name it "signature brush" or whatever you like. Notice also that the size of the brush (in pixels) is listed below the preview. That will be the default size that this particular brush opens to. Remember, you can change it to whatever size you like later - up to 2000 pixels. The larger it is here, the less fuzzy it will be at those large sizes.

That's it! Really! Open a new file and play around with your new brush. It will be listed in with all the others that you had currently active. Be careful, however, as it is not yet saved as a part of a brush file, and if you go load a different set of brushes in, it will be lost. We'll show you how to save it in just a moment. Let's make a second, more complex brush, first - then we can save them as a brush set!

Open a picture - any image file will do. I've chosen to use one of my speedpaintings, a penguin. Crop the piece around the part of it that you would like to make into a brush file. You don't want any extra room on the edges that you need to worry about.

You're going to want to have all white surrounding that penguin so that when you make the brush, it doesn't end up with the background being a part of it, too. You can either erase around him and add an all white layer just beneath that layer (multiple layers are fine when it comes to making brushes - it will act as though it was all one flat image when it creates it) or you can simply paint white in around him.

Again, go in to Edit. Define Brush Preset and create your brush. See how all those blues are created to grayscale? All brushes are created that way - Photoshop will do it for you. That is so that when you choose a brush to paint with, you can use whatever color you want! Name your brush and click "OK". Again, feel free to play around with it in a new file. This is what my new brush looks like:

What good is all of that if you can't save them, though, right? So, here's the last part of the tutorial. Saving your new brushes as a set. Go back into your brushes and delete any of the ones that had been previously in there - ones that you do NOT want as a part of your new set. Don't worry, this doesn't delete them as a file, it just removes them from your list of "active" brushes. To do that, right click on the brush you want to delete, and click on "delete" - as simple as that!

When you are left with ONLY the brushes that you want as a part of this new set, click on the same arrow that you would click on to load up new brushes (highlighted in red on the picture to the right), then choose "Save as..". Now, you're going to want to put this in the right directory, so that it will automatically load up in your list of brushes whenever you start Photoshop. Within your Photoshop directory, place it in the Presets>Brushes folder. For example, if you installed Photoshop CS onto your C drive in the path that the installation program defaults to, you would find this folder in: C:\Program Files\Adobe\Photoshop CS\Presets\Brushes\. Choose an appropriate name for it, and you're done!
Note: You will have to reopen Photoshopbefore that brushes set will be visible among those that you can choose from the menu on the right. Alternatively, you can choose "load brushes" and do it manually, but that will append them to the current "active" brushes rather than opening them on their own.
